Sound problems in Windows 11 have become a common issue, and certain users who have recently switched to Windows 11 have reported the issue. Basically, within the Windows 10 or lower versions, it’s not required to change the motherboard’s bios settings. Still, before the installation process of Windows 11, we have to enable the Secure Boot as well as the TPM. As a result, the audio settings get turned off by mistake. However, several users have managed to fix the issue just by turning off the audio enhancements and reinstalling or updating the drivers.
Several reasons could be considered behind the Sound problems in Windows 11, possibly that the audio drivers are incompatible with your motherboard, or else using a third-party driver, you need to make sure that you are downloading drivers from the official manufacturer’s website. Here’s a look at some causes:
- Old & outdated corrupted drivers
- Disabled Windows audio service
- Enabled audio enhancements
- Unsupported sample rate
- Audio drivers not compatible
- Faulty audio ports
How To Fix Sound Problems In Windows 11?
Here are a few troubleshooting tricks you can follow to solve the Sound problems in Windows 11.
– Update Sound Drivers through the Device Manager
Using corrupted or outdated drivers may lead to Sound problems in Windows 11. Although the issue can be fixed by updating the sound drivers and here we have provided you the steps on how you can update the sound drivers through the Device Manager:
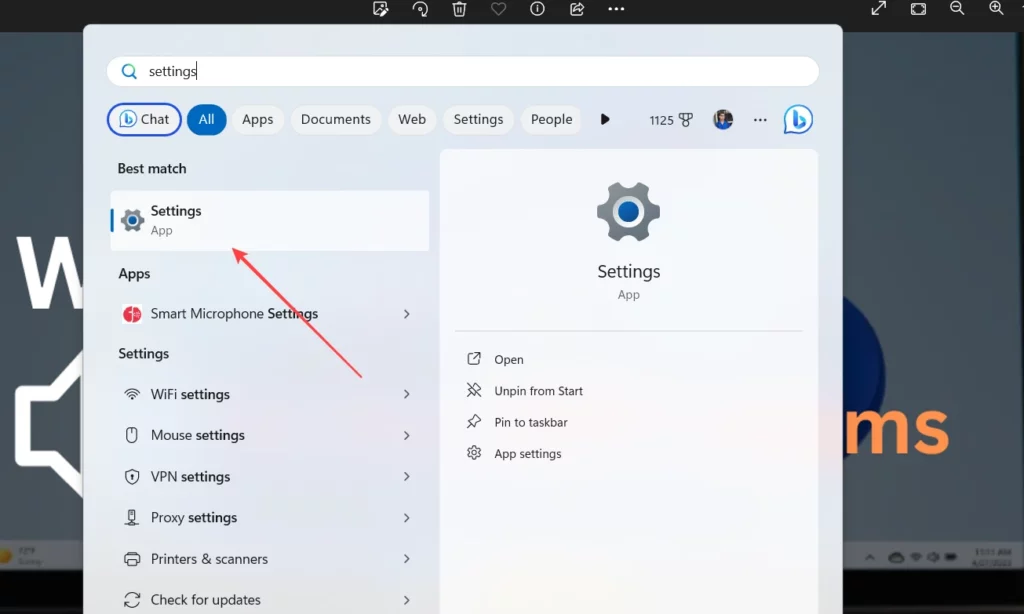
- In order to update audio drivers, right-click on the Start menu.

- Then press the Device Manager option.

- Expand the Sound, Video, and Game Controllers option.

- Now right-click the desired audio driver and select Update driver.

- Click on the Search automatically for drivers option when you are asked the ways to search for drivers.
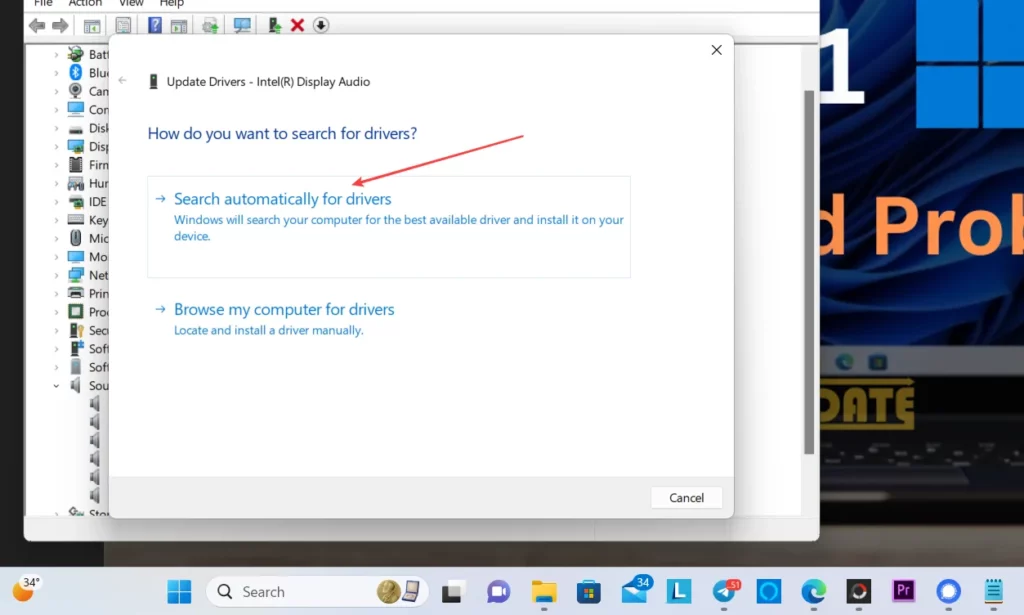
- Once done, check if the Sound problems in Windows 11 have been resolved or not.
– Disable Audio Enhancements
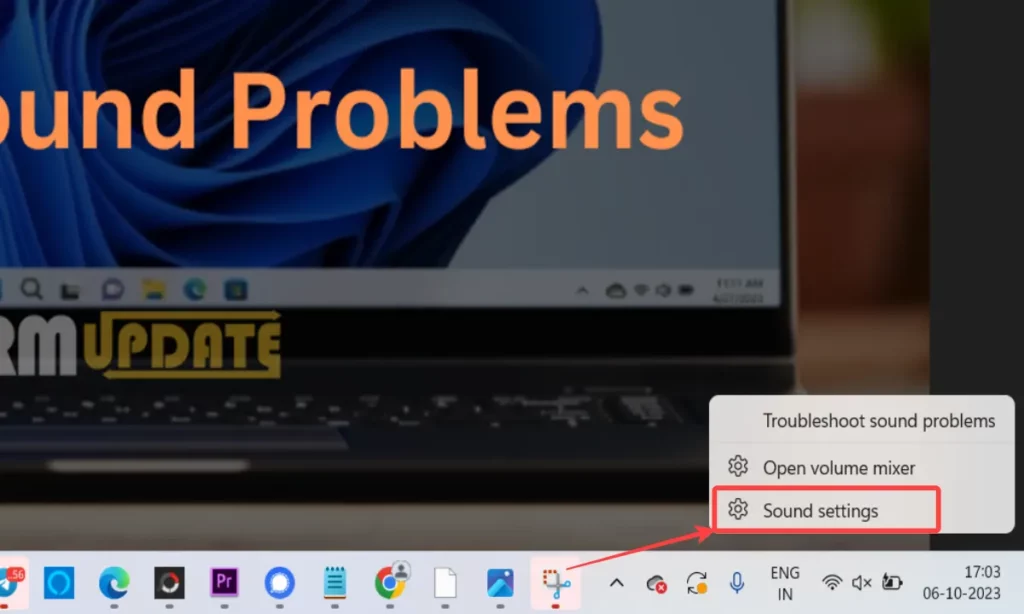
Turning off the Audio enhancements can solve your Sound problems in Windows 11. The audio enhancements might lead to generating sound problems in windows 11. So it’s recommended to turn off the audio enhancements; steps are mentioned below:
- Firstly, right-click on the sound icon.
- Select Sound Settings.
- Now, scroll down to the bottom.
- Then tap on More Sound settings.

- Right-click on the Speakers icon and tap Properties.

- Press the Enhancements option.
- Click on the Disable All Enhancements box.

- Once done, tap Apply and then select OK.
– Run Audio troubleshooter
Doing this might solve the Sound problems in Windows 11.
- Open Settings by pressing the Windows+I shortcut keys.
- Now, under System, scroll down to the bottom and navigate to the Troubleshooters.
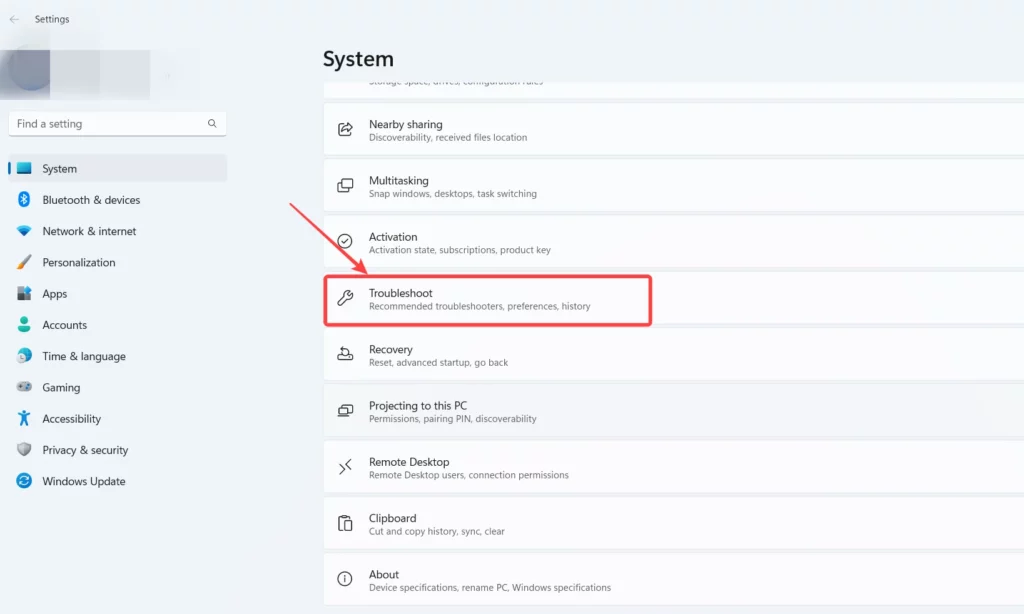
- Select Other troubleshooters.

- Tap on the Run option and then select the current audio driver.

- Now click Next.
- Finally, check if the issue has been resolved or not.
– Restart the Windows Audio Service
It’s responsible for enabling sound on Windows. In case the service is stopped or not working up to the user’s expectations, you will not be able to hear the audio from the computer unless you enable the service again.
- Tap on the Start menu and type Services.

- Open the Services window and right-click Windows Audio Service.

- Select Properties and change the Startup Type from Manual to Automatic.

- Tap Apply, then click the Start button, and then press to close the Window.

- Now check whether the Sound problems in Windows 11 have been resolved or not.
– Change Audio Ports
Sometimes, the faulty ports are responsible for the Sound problems in Windows 11. Therefore, try using the back panel audio jacks in order to make sure the ports are working. Nevertheless, the issue hasn’t been resolved. The problem is within the hardware of your headphones or the speakers.
– Change the Sample Rate
The most common sample rate is between 44kHz and 48kHz. Try changing the sample rate, as it might help resolve the Sound problems in Windows 11.
- Press the Start menu and type Settings.
- Open Settings and navigate to Sounds.

- Click All sound devices, which you will find under the Advanced tab.

- Under the output devices tab, click the Speaker option.

- Here, change the sample rate to lower or between 44kHz to 48kHz.

– Set speaker as a Default Communication
Another way to resolve the Sound problems in Windows 11 is to try to set the speaker as a default communication. You can do this by following the instructions mentioned below:
- Right-click the Start menu and press Settings.
- Go to Sounds and then Scroll down to the bottom.
- Click the More Sound Settings.
- Now right-click on the primary audio device and select Set as Default Communication device.
- Finally, press Apply and then tap on OK.
“If you like this article follow us on Google News, Facebook, Telegram, and Twitter. We will keep bringing you such articles.”