Though Windows is an exceptional operating system with some impressive capabilities like other electronic devices, it can sometimes act weird or not perform as per our expectations. In the same context, there are several users who have been complaining about their Windows screen showing some noticeable yellow shade.
It’s been quite some time, and a number of users have shared their complaints through screenshots that they have been experiencing issues with their Windows screen. Users have claimed that they have been noticing some hints of yellow shade on their Windows screen, which is definitely not usual.
Noticing this sudden turning of their Windows screen into yellow, some users suggest that this issue might be occurring due to some hardware issues, while others believe that it’s a glitch within their Windows display settings. However, it is possible that both reasons are true. Thankfully, through some workarounds, you can easily solve your Window’s screen turning yellow.
How Do You Fix a Yellow Screen On Windows 11?
You have come across a sudden turning of your Windows 11 screen yellow, which is annoying and looks very unpleasant. Here are some workarounds that can troubleshoot your problem. You just need to follow them in chronological order.
Change the Color Profile of your Windows display.
In order to resolve your Windows issue, just try to change your Windows display colour profile. However, the colour profile is already set by default by the manufacturer. Still, you can easily manage to change these default settings at your convenience. Here’s how:
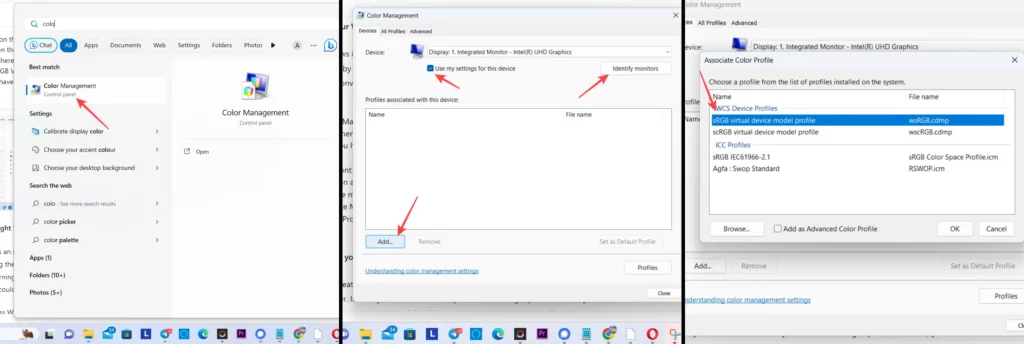
- Head to the Start Menu.
- Here, search for the Color Management option.
- Tap on the Color Management tab and make sure that the device selected is one you are currently working on, and in case you have plugged in your monitor, you could tap on the Identify monitors option.
- Tick mark on the box in front of Use my settings for this device option.
- Then tap on the Add option at the bottom of the screen.
- After that, here you will see multiple colour options under the Associate Color Profile tab.
- Use the sRGB Virtual Device Model Profile from the given list and then tap on OK.
- Once you have added the Profile, you might tap on the Set as Default Button and then just exit the settings.
Access Night Light Settings on your Windows:
Windows sports an integrated feature, the Night Light, which allows you to reduce blue light from your PC by increasing the yellow filter. In case you need to work on your PC for a longer period of time, you can consider turning on this filter. However, the Night Light settings can behave abnormally, and in such situations, you could either configure the settings or just turn them off.
- Firstly, press Windows+I to open the System Settings.
- Within the System Settings, head to Display.
- Here, search for the Night Light toggle and turn it off.
- By turning on the Night Light, you can be assured that your Windows display is fine.
- Now turn on the Night Light toggle again and then manage the strength by moving the slider as per your preferences.

Update the Graphics Driver:
Sometimes, you might face certain issues within your Windows because you are using outdated graphics drivers on your PC. In addition, there are several users who are unable to update their driver individually as the download option isn’t available to them. To check whether the latest update is available or not, users had to configure a number of settings.
- Right-click on the Start button and then select Device Manager from the given context menu.
- Once the Device Manager opens, look for the Display adapters section. This will significantly showcase your graphics card or integrated graphics.
- Then Right-click on your graphics card or integrated graphics.
- Here, select the Update driver option.
- Then select Search automatically for updated driver software.
- In case Windows finds a new updated driver, it will automatically Download and install the latest driver.
- Follow the on-screen instructions when prompted.

Use the Calibrate Display Color feature:
Windows offers an in-built Calibrate Display Color feature that allows you to make your display colour more precise. For that, you need to perform the colour calibration manually.
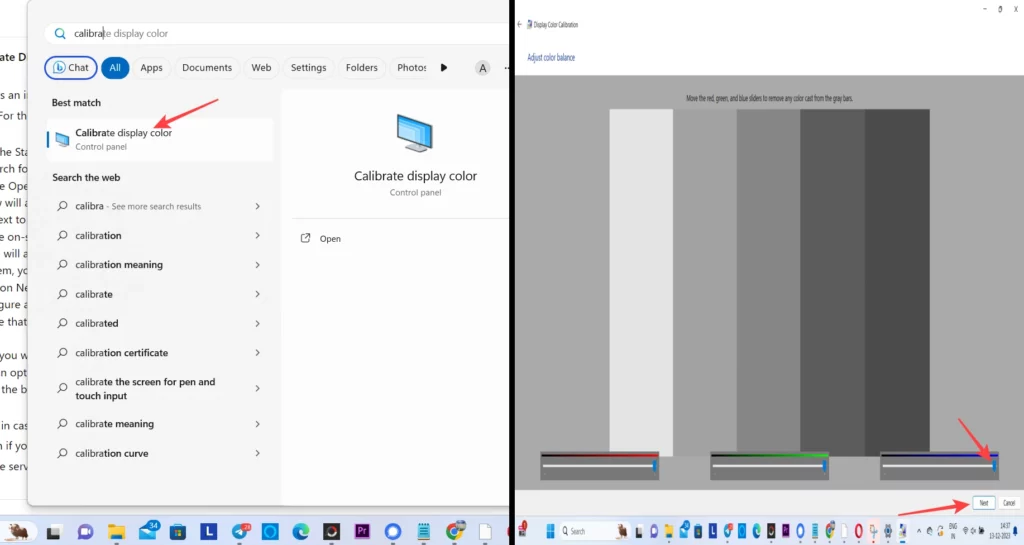
- Head to the Start menu.
- Then, search for the Calibrate Display Color option.
- Tap on the Open option or Press enter to open it.
- A window will appear for colour Calibration,
- Tap on Next to begin the process.
- Follow the on-screen instructions and tap on the Next after each prompt.
- Here, you will also get an option to adjust the Brightness and contrast; however, if you don’t wish to adjust them, you can skip this step too.
- Then tap on Next. Here, by tapping on the Next option, you will see an RGB controller, which you can configure as per your preferences.
- Make sure that you move sliders carefully so that the yellow hints can be removed and are no longer visible.
- Finally, if you wish to preview the changes you have made, you can just click on the Previous Calibration option as well as Current Calibration; otherwise, to skip this step, just press the Finish option at the bottom.
Wrapping up, in case you are unable to resolve the issue and the yellow hints are still visible on your Windows, even if you have followed all the above-mentioned steps, then the last step left for you is you can head to the service centre for its servicing, as there could be some kind of manufacturing malfunctions.
“If you like this article follow us on Google News, Facebook, Telegram, and Twitter. We will keep bringing you such articles.”